
How to Edit Multiple Videos Together
Editing multiple videos together is a common workflow for tutorials, highlight reels, recap videos, social posts, and presentations. This guide shows how to edit multiple videos together using Pexo in four steps—from uploading clips to exporting a finished video.
What You Need
Before you start, prepare the following:
-
Multiple video clips you want to combine
-
A Pexo account
-
A clear goal for the final video format
-
Optional: music, captions, brand assets, or voiceover files
If your footage looks blurry or poorly lit, consider improving it before editing. Cleaner source material usually produces smoother transitions and more consistent final output.
Choose your target aspect ratio before uploading:
-
16:9 — YouTube and presentations
-
9:16 — TikTok, Reels, and Shorts
-
1:1 — Square social posts
Planning this early helps avoid cropping and resizing issues later.
Step-by-Step: How to Edit Multiple Videos Together
Step 1: Upload Multiple Videos to Pexo
The first step is uploading all clips directly into Pexo.
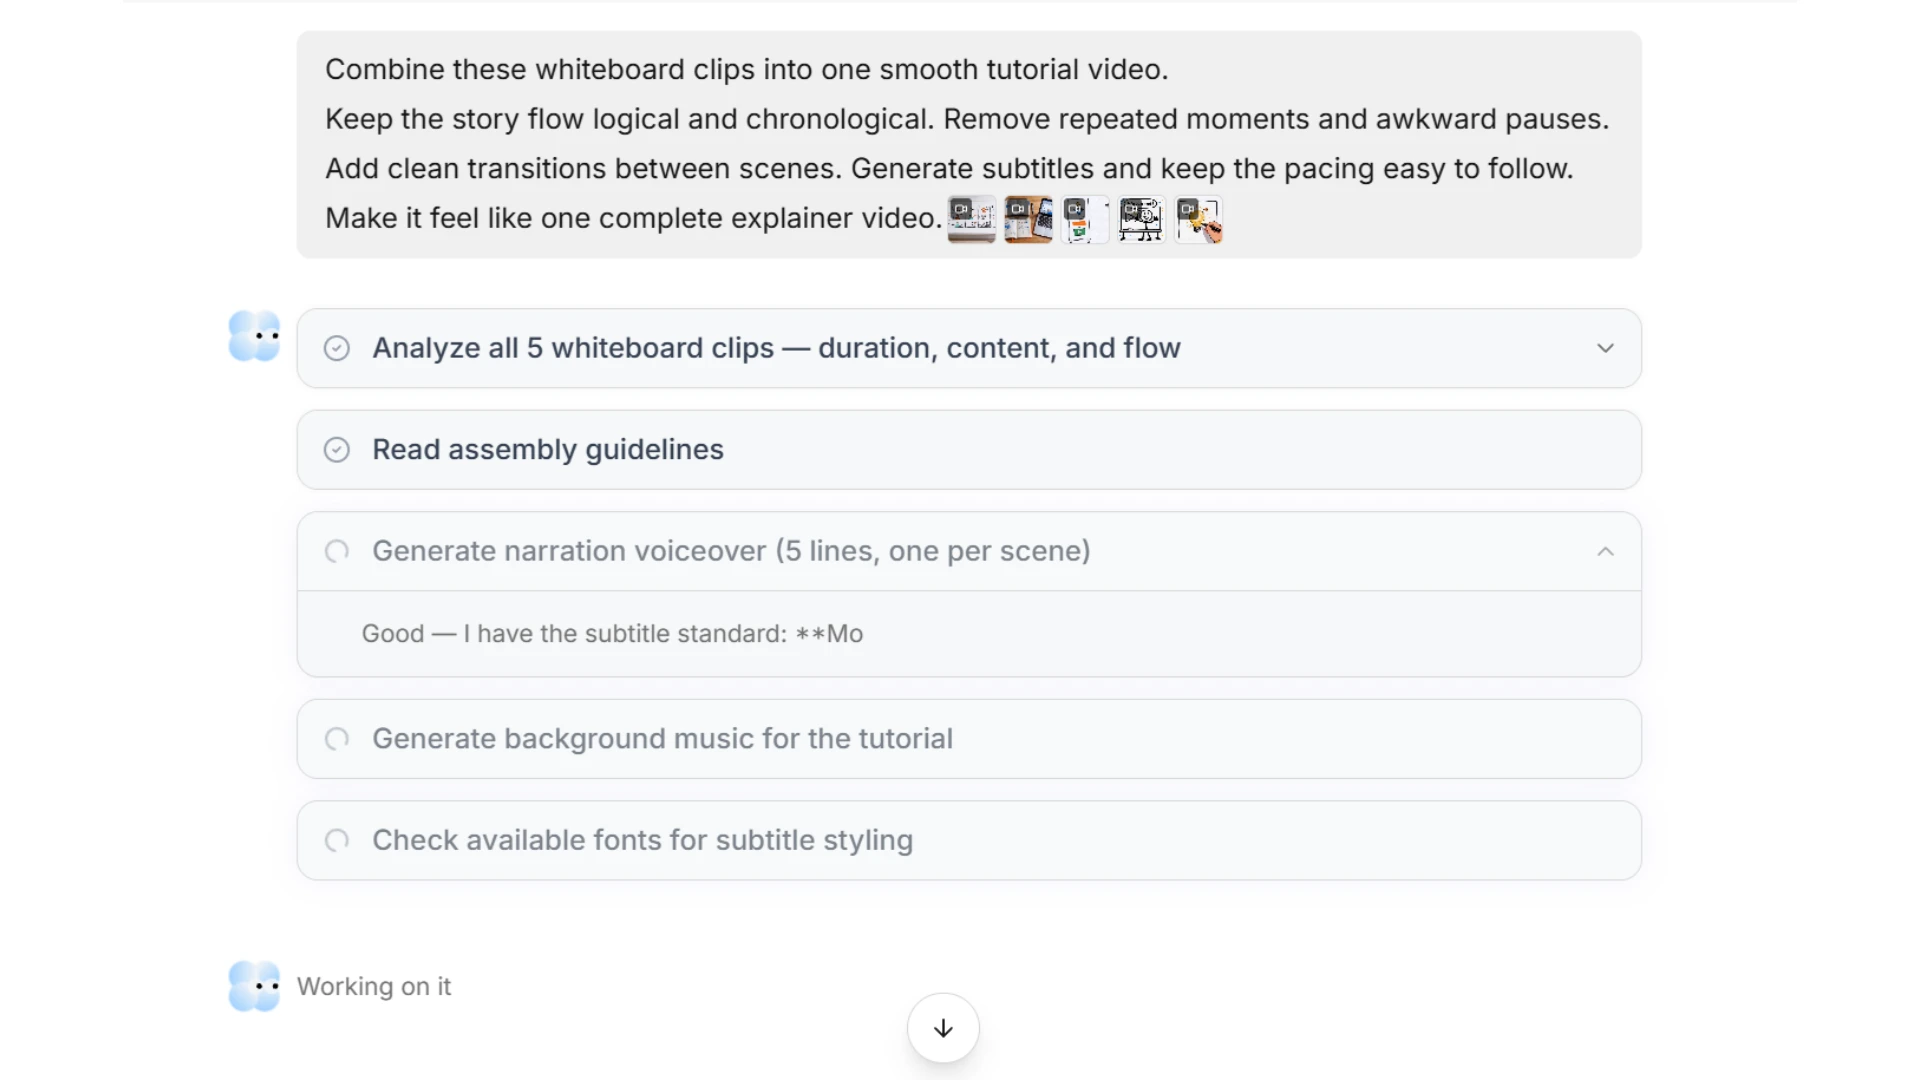
Open the Pexo homepage and upload the videos you want to combine. Instead of building a timeline manually, Pexo uses AI to understand and edit multiple clips based on your instructions.
First, open the Pexo homepage and upload all the video clips you want to combine. Once uploaded, wait a moment while the files are processed. After processing is complete, your videos are ready for AI-powered editing.
 What to check:
-
All clips uploaded successfully
-
Files are complete and not corrupted
-
Video order or intended story flow is clear before prompting
Step 2: Tell AI How You Want the Videos Combined
After uploading, describe the result you want.
Instead of trimming clips manually, use natural language to tell Pexo how the final video should look.
Examples:
-
Combine these clips into a travel recap video
-
Create a fast-paced highlight reel with smooth transitions
-
Merge these videos into a tutorial with subtitles and background music
-
Keep chronological order and remove repetitive scenes
What to check:
-
Prompt clearly explains the desired style
-
Tone and pacing are specified if relevant
-
Important instructions are included early
Specific instructions usually produce more predictable results than generic prompts.
Step 3: Review the AI-Generated Video
After processing, Pexo generates a first version of the combined video.
Review the result before exporting.
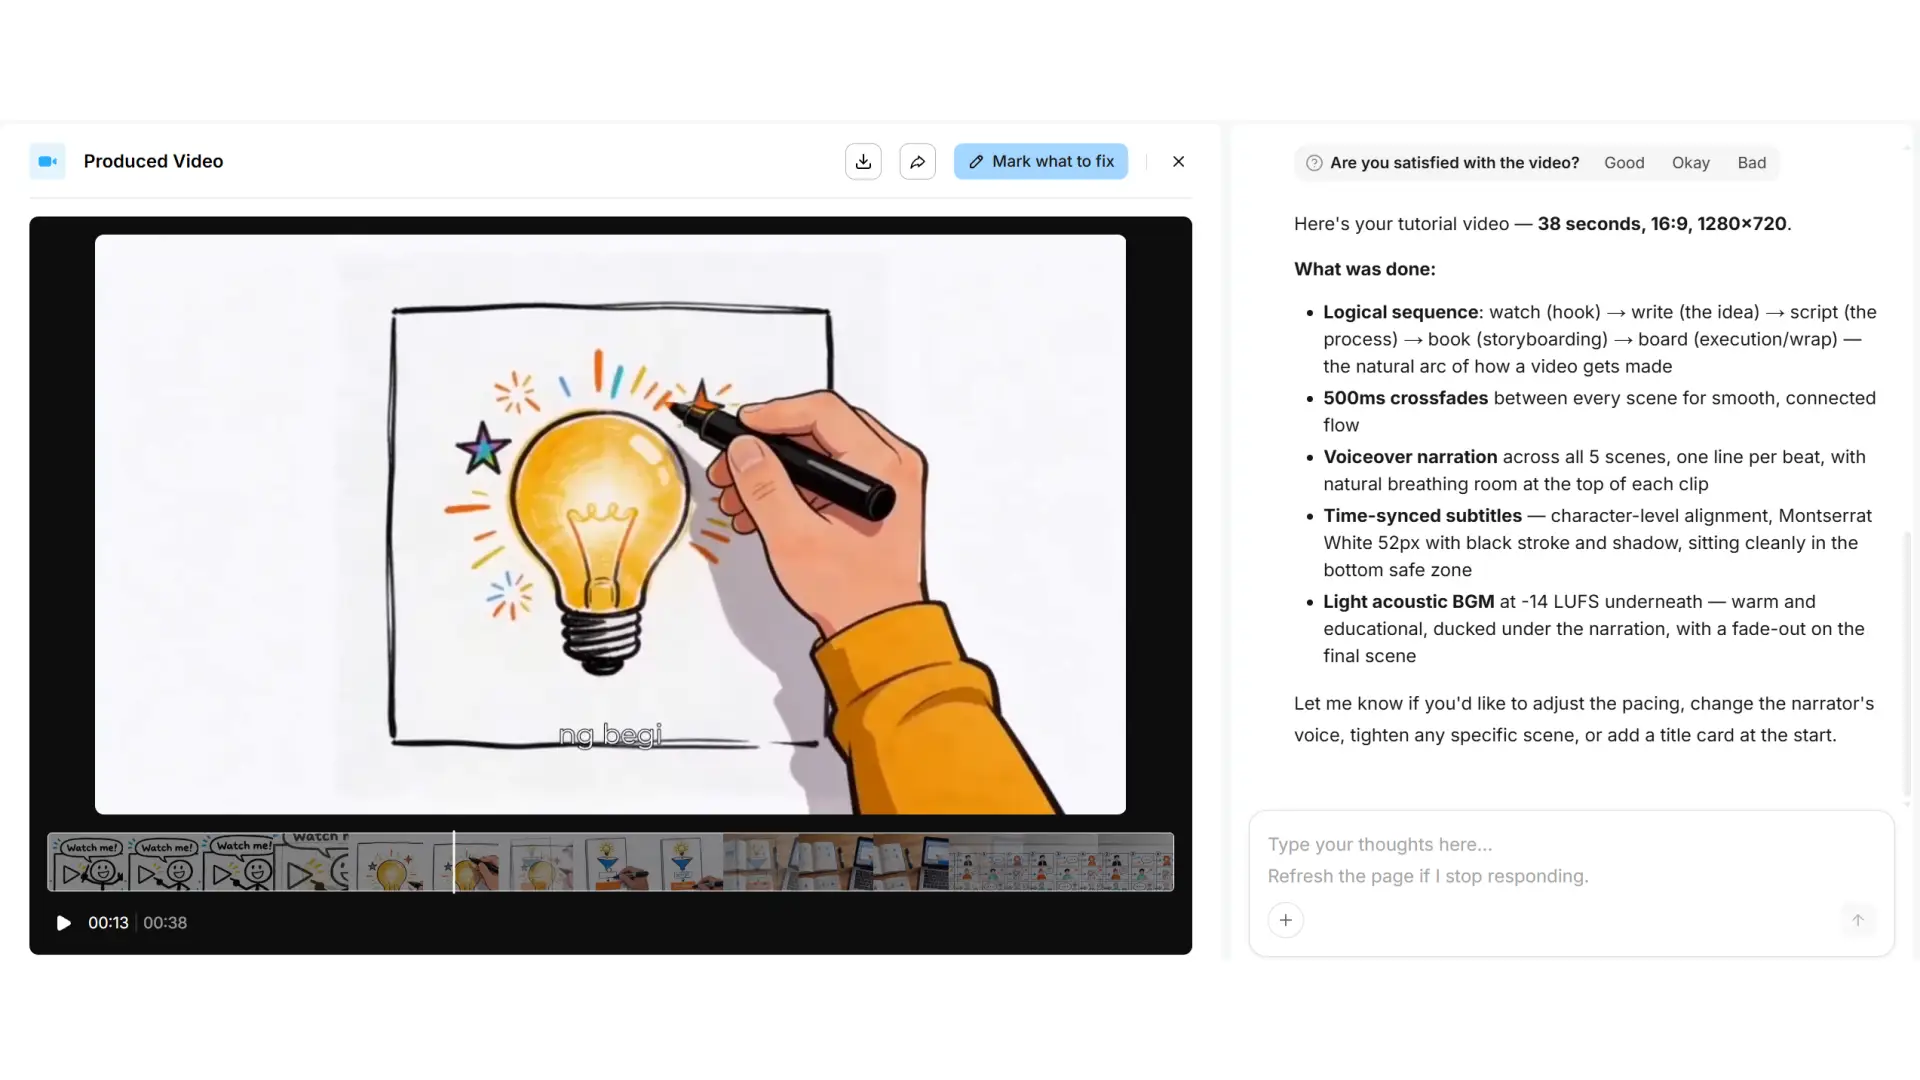
What to check:
-
Scene order
-
Transition smoothness
-
Audio balance
-
Subtitle accuracy
-
Overall pacing
The first AI result is often close to the final version, but reviewing helps identify areas that still need refinement.
Step 4: Circle and Annotate Areas You Want to Improve
If part of the generated video does not match your expectations, use Pexo's annotation feature.
Circle or mark the area you want changed and describe the adjustment using natural language.
Examples:
-
Make this transition smoother
-
Shorten this scene
-
Improve subtitle placement here
-
Remove this awkward pause
-
Make this section feel more energetic
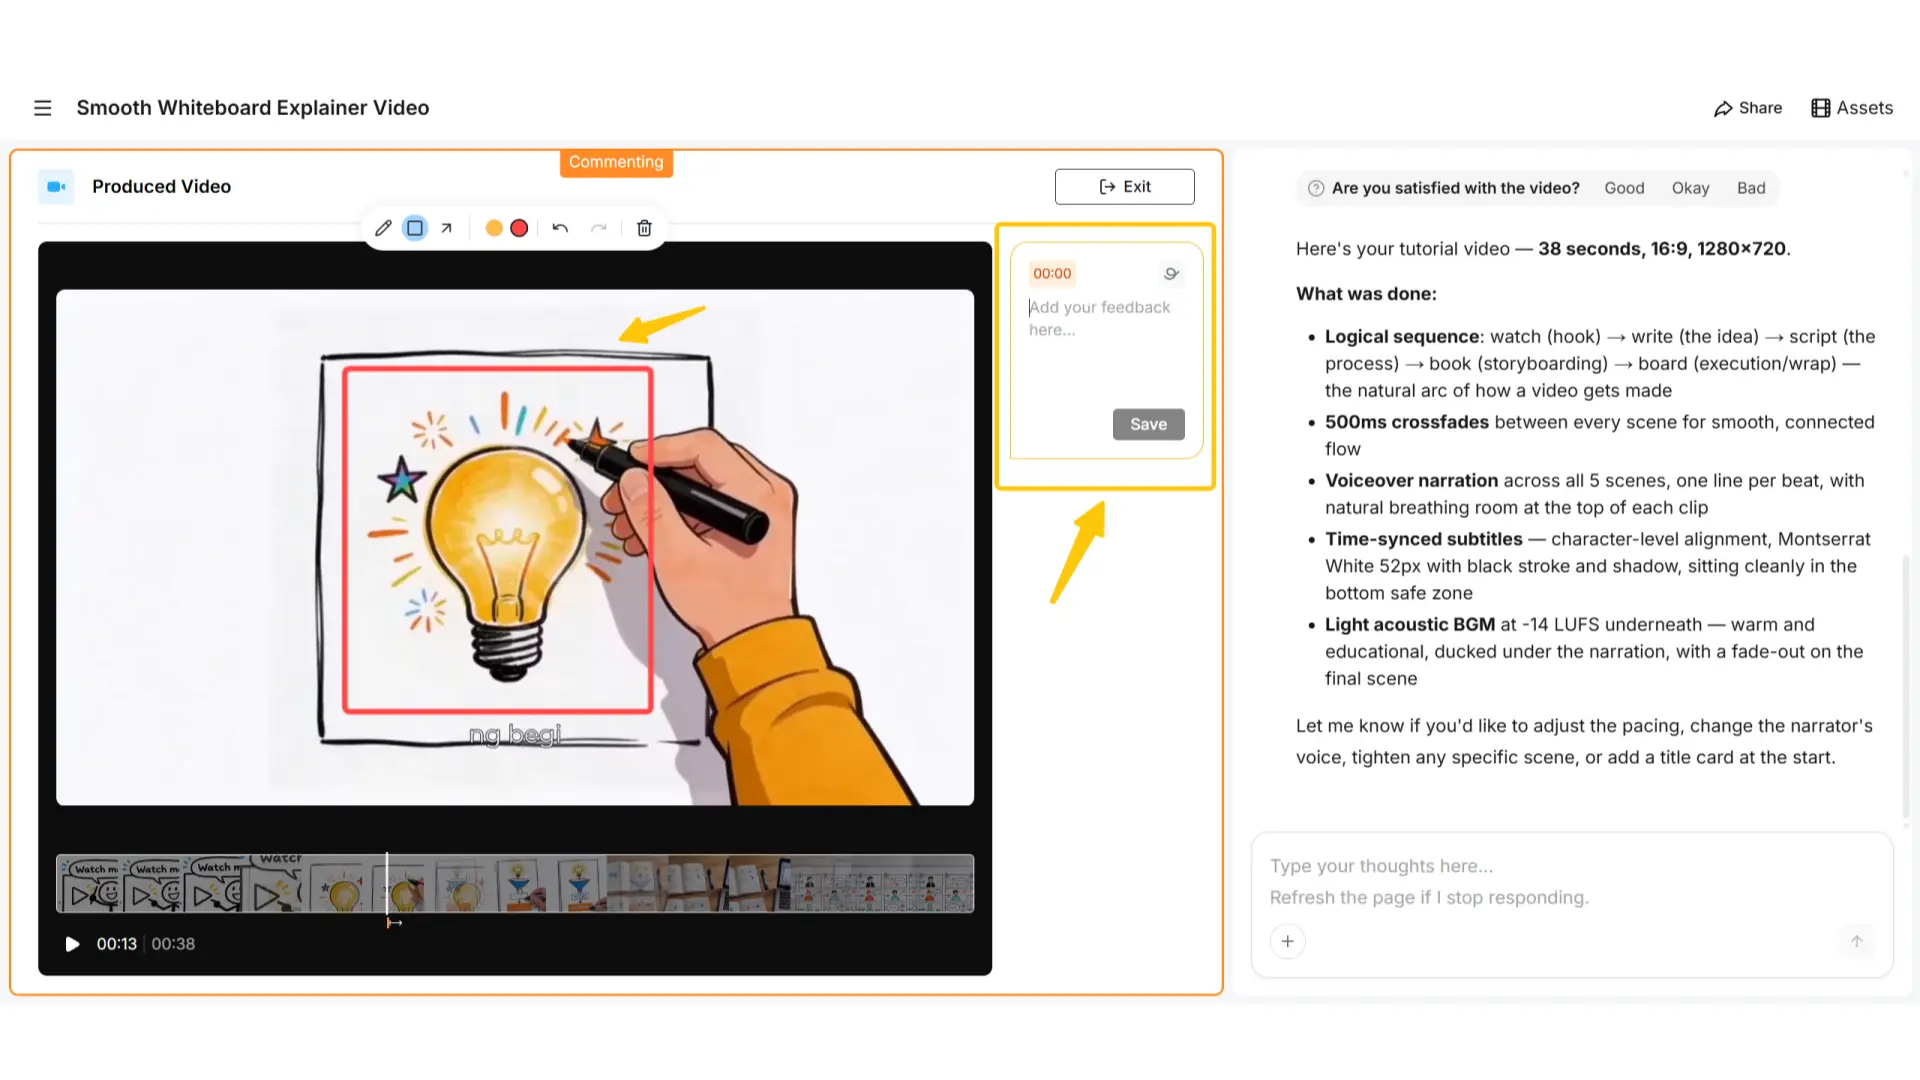
What to check:
-
Mark the correct scene or visual area
-
Give clear instructions about the change
-
Review each revision before moving forward
Annotation helps AI understand exactly which part needs improvement.
Step 5: Export the Final Video
Once you’re happy with the AI-edited video, export it and share it wherever you want.
What to do:
-
Wait for the video to finish processing
-
Publish it to your social media platform or save it locally
Common Mistakes When Editing Multiple Videos Together
Mixing Aspect Ratios Without Planning
One common mistake is combining vertical and horizontal clips without deciding on a final format first. This often leads to black bars, awkward cropping, or stretched footage that looks inconsistent across scenes. To avoid this, decide on your target aspect ratio early and keep it consistent throughout the editing process.
Using Too Many Transitions
Transitions should support pacing rather than dominate the video. When too many effects are added, the final result can feel distracting and overly edited. In most cases, simple cuts or subtle fades create a cleaner and more professional viewing experience.
Ignoring Audio Balance
Videos recorded on different devices often have uneven sound levels. One clip may sound much louder than another, or background music may overpower narration. Before exporting, review the entire video and make sure dialogue, music, and ambient sound feel balanced from start to finish. If you are exploring how AI handles scene planning and video refinement automatically, learning about an AI video agent can help you understand the workflow better.
Leaving Gaps Between Clips
Small gaps between clips are easy to miss during editing but can create unexpected pauses or black frames in the final video. Reviewing the full sequence carefully before export helps catch these issues and keeps the pacing smooth.
Exporting With the Wrong Resolution
Choosing incorrect export settings can reduce video quality and create compression problems after uploading. To maintain clear playback and avoid blurry results, match your export settings to the platform where the video will be published.
Pro Tips for Better Multi-Clip Editing
Keep a Consistent Visual Style
When clips come from different devices, brightness and color may vary.
Adjust lighting and color balance before exporting for a more unified look.
Build Around Audio
If the project includes narration or music, edit around the audio rhythm.
This often creates stronger pacing.
Use Captions for Social Content
Many viewers watch short-form videos with sound muted.
Captions improve accessibility and help communicate information immediately.
Organize Files Before Uploading
Rename clips and remove unused footage before importing.
Preparation speeds up the editing process.
If you plan to repurpose the finished video into thumbnails or promotional graphics later, supporting design tools can help build those additional assets.
What Else Can You Use?
Different video editors fit different workflows. If you want alternatives for combining multiple videos, here are a few common options and where they work best.
| Product | Best For | Editing Style | Platform |
|---|---|---|---|
| Pexo | AI-assisted multi-video editing | Nature language+ AI refinement | Web |
| CapCut | Fast short-form video editing | Mobile-first timeline | Mobile / Desktop |
| Canva Video Editor | Presentations and marketing content | Template-based editing | Web |
| Adobe Premiere Rush | Adobe users and cross-device workflows | Traditional timeline editing | Desktop / Mobile |
| iMovie | Beginner-friendly video editing | Simple timeline editing | Apple devices |
Pexo
Pexo uses AI to combine and refine videos through natural language instructions. Instead of manually editing every clip, you can upload multiple videos, describe the result you want, and make improvements through annotations and AI feedback.
CapCut
CapCut is popular for short-form and mobile-first editing. It works well for creators who need quick social media edits with templates, effects, and timeline controls.
Canva Video Editor
Canva Video Editor focuses on template-based design and drag-and-drop editing. It is commonly used for presentations, social graphics, and marketing content.
Adobe Premiere Rush
Premiere Rush is a lightweight Adobe editor with cross-device syncing. It suits users already working inside Adobe workflows and looking for a simplified editing experience.
iMovie
iMovie is a beginner-friendly editor for Apple devices. It supports basic multi-clip editing and is suitable for users who want simple controls without advanced production tools.
Conclusion
Editing multiple videos together comes down to four main steps: upload your clips, arrange them on the timeline, add transitions or audio, and export using the correct settings.
Pexo keeps the workflow straightforward while still giving you enough control for tutorials, social content, highlights, and everyday video projects.
If your clips are ready, you can start building your first multi-video edit in just a few minutes.