 ChatGPT
 Perplexity
 Claude
 Gemini
 Grok



How to Make Videos with Kimi K3.1 Pro in Claude Code
UPDATED: 2026-11-03
To make videos with Kimi K3.1 Pro in Claude Code, follow 8 steps: select the model, connect an installed Pexo skill, submit a specific brief, and review the returned video.
How to make videos with Kimi K3.1 Pro: quick version
This overview groups setup checks; the numbered Step headings below give the full sequence.
- Confirm that Claude Code is using Kimi K3.1 Pro and can execute a small tool task.
- Install and authenticate the Pexo skill for the chosen host.
- Supply a clear brief and the reference assets the video requires.
- Track the existing project until a finished video is returned.
- Review, revise, and save the actual video file.
Set up Claude Code for the video workflow
Kimi K3.1 Pro is a text-output reasoning model with image and video understanding. That capability is different from rendering a finished video file. OpenRouter documents third-party model routing for Claude Code but warns that non-Anthropic providers may behave differently. Treat a successful tool-call check as a prerequisite, not an optional benchmark. This tutorial describes a documented integration path; it does not claim that this exact model-and-skill combination has been tested end to end by the author.
The model documentation establishes what the model does. The host setup documentation covers the connection or skill mechanism. The following instructions combine those documented components; they are not a claim of built-in Pexo integration or a hands-on performance test.
Step 1: Select Kimi K3.1 Pro in Claude Code
Connect Claude Code to OpenRouter using its Anthropic-compatible gateway. Set ANTHROPIC_BASE_URL to https://openrouter.ai/api, load ANTHROPIC_AUTH_TOKEN from your OpenRouter key, and leave ANTHROPIC_API_KEY explicitly empty for this gateway session. Set ANTHROPIC_MODEL to moonshotai/kimi-k3.1-pro for the main model. Relaunch Claude Code so the environment reaches the process. Use /status and the provider activity record to check the route; a familiar application name alone does not prove which model answered.
Step 2: Verify the model route with a small tool task
Verify the Kimi K3.1 Pro route with a harmless local tool task. In a disposable project folder, ask Claude Code to create route-check.txt containing Kimi route OK and read it back. Inspect the actual file and provider activity rather than accepting the model's self-description. A plain chat response is insufficient because video production requires tool execution. Resolve model-not-found, authentication, or unsupported-tool errors before installing additional integrations or launching a render.
Step 3: Separate gateway credentials from video credentials
Separate the gateway credential from the Pexo credential before generating media. OpenRouter authorizes the reasoning model request; Pexo authorizes the production service. Store each value in the location required by its own setup instructions, and do not reuse one value for both services. If Claude Code reports an existing-login conflict, follow the gateway documentation to resolve that conflict. Do not change unrelated account sessions or repeatedly submit the same production request while diagnosing access.
Step 4: Install the Pexo skill for your agent
Install the Pexo skill for Claude Code from the official Pexo skills repository. The repository currently gives npx skills add https://github.com/pexoai/pexo-skills --skill pexo-agent as its installation entry point. Choose the intended agent when the installer offers host selection, and follow the installed skill's credential setup. Restart or refresh the agent and confirm that the skill is available. Installation adds instructions and tools; it does not make Pexo an intrinsic feature of Kimi K3.1 Pro.
Step 5: Write a concrete video brief
Write a concrete video brief that names the subject, audience, requested duration, format, and message. For this walkthrough, request a 15-second vertical product video using a product photo you own, with one factual benefit and an ending call to action. Keep the brief in a local file so revisions can be compared against the original request. Ask Claude Code to use the installed Pexo skill and relay your brief without inventing product specifications, prices, or testimonials.
Step 6: Submit the brief and keep the project reference
Submit the approved brief through the installed skill and save the returned project reference. Provide local reference files through the upload method documented by the skill; writing a file path in a message does not itself upload the image. Once production starts, check the existing project's status rather than creating another project. Answer any clarification in the same conversation. A submitted request or an initial acknowledgement is not evidence that a video has finished rendering.
Step 7: Review the video and request a focused revision
Review the returned video from beginning to end before accepting the result. Check the product shape, visible text, factual claims, spoken words, music balance, and requested aspect ratio. Record corrections against observable moments, such as an unreadable closing card or narration that names the wrong material. Send one consolidated revision request to the same project. Keeping the project reference makes the intended revision clear and avoids accidentally starting an unrelated video.
Step 8: Save the finished video and production notes
Save the finished video and the final project reference together. Open the downloaded file in a local player to confirm playback, sound, and the intended framing before handing the file to a teammate. Keep the original brief, reference filenames, and revision notes beside the export. If the returned download URL is temporary, retain a local copy rather than treating that link as permanent storage. Distribution is a separate action after the video has been reviewed.
How to make the video with Pexo
Pexo is the production agent in this workflow. The coding host carries your instructions and calls the installed integration. The language model selected in that host is not the video model used to render each shot. That separation also explains why changing the host model cannot by itself unlock Pexo access or pay for a production request.
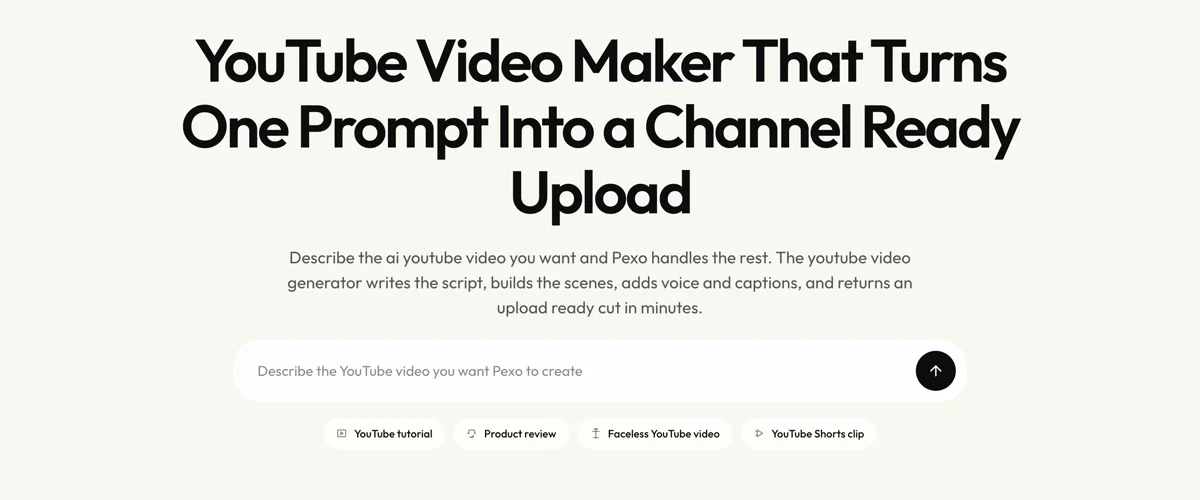
For a simple first job, use the product video workflow to define the outcome. The YouTube video entry point below shows a real prompt field and a Product review preset. This web interface is an alternative way to start a related product showcase; it is not a Codex or Claude Code plugin panel.
A practical request specifies the result without manufacturing evidence: “Use my attached product photo to make a 15-second vertical video. Show the product clearly, use the benefit in my supplied notes, and end with the exact words ‘See the collection.’ Add restrained music. Do not invent product claims.” Those numbers describe this example brief, not a promise that every request completes in a fixed time.
Choose source material deliberately. Image to video starts with a visual reference, while script to video is useful when the wording is already approved. A plain-language idea fits text to video. Keep required brand wording separate from mood directions so the agent can distinguish fixed copy from creative latitude.
Common pitfalls
- Selecting a model without installing production tools: the session can describe a video but cannot deliver one through an absent integration. Confirm that the installed skill is discoverable before submitting the creative brief.
- Treating a gateway key as a Pexo key: one account may answer successfully while the other rejects production. Diagnose the failing service separately and load the credential expected by that service.
- Resubmitting while a render is running: a new project can create another job instead of checking progress. Keep the original project reference and request its status.
- Approving from a thumbnail: the opening frame can look correct while later captions or spoken claims are wrong. Watch the complete file, including the final card and audio ending.
Related video workflows
Match the next project to the material you actually have. A product explainer video can focus on how a product works; a social media video focuses on a social placement. If the soundtrack is the starting point, explore audio to video before writing an unrelated visual brief. These are adjacent production tasks, not substitutes for checking the host configuration.
To make videos with Kimi K3.1 Pro in Claude Code, keep model selection, skill access, and media review distinct. Success means a playable file that matches the brief, not a confident text response or a submitted job. Start with one modest project, preserve its reference, and carry the checked result into your next product video project.
By Liora Adler, Video Workflow Writer.