 ChatGPT
 Perplexity
 Claude
 Gemini
 Grok



To make an animatic, put storyboard panels into a timed sequence, add provisional sound, and revise the holds until the action reads. This workflow uses Pexo for storyboard stills and scratch audio, then your existing sequence or timeline app for precise assembly, retiming, and export.
An animatic tests whether viewers understand a scene at its intended pace. It is timed storyboard playback, not finished animation. Here, Pexo supplies media; the assembly app controls exact holds, sound cues, and export. Extra poses show changes that a single still cannot convey.
What to prepare before you start
Begin with one scene, a target running time, and an agreed frame shape. For a short-film project, choose a scene with a clear problem and a visible response rather than compressing the whole film into this exercise. You need numbered panels, provisional dialogue or sound, and an app that supports still-image durations, audio tracks, and movie export.
Choose the sequence frame rate before timing. The example below uses 24 frames per second, a wide frame, and a proposed 36-second running time. These are illustrative planning choices, not tested results or required settings. Keep artwork and sound in separate folders, with a timing table beside the sequence project. Stable filenames will matter when drawings change after feedback.
How to make an animatic: Step-by-step
The example uses six shots and eleven still poses. A beat is a story change; a shot keeps one camera setup; a pose is one drawable state within that shot.
Step 1: Break the scene into readable beats
Write what changes in each panel before producing artwork. In this proposed scene, a courier protects a paper parcel when an umbrella fails. The failed umbrella causes the search for shelter; the shelter motivates the crossing; the dry parcel resolves the original problem. Avoid adding an unrelated reveal just to make the sequence longer.
Use this table as an untested first timing pass. Out points are exclusive. At 24 fps, the holds total 864 frames, or 36 seconds. Longer holds reserve reading time, especially for the shelter geography and final reaction; playback must justify them. Each row is a static state, not an instruction for a still to animate.
| Shot / pose ID | In–out, seconds | Hold | Frames | Exact still state | Sound cue |
|---|---|---|---|---|---|
| P01 | 0–5 | 5 s | 120 | Courier halted, eyes on raindrops hitting parcel | Rain; footsteps stop |
| P02A | 5–7 | 2 s | 48 | Umbrella open normally; courier braced against wind | Gust begins |
| P02B | 7–10 | 3 s | 72 | Umbrella inverted; courier staring at broken canopy | Snap at 7 s |
| P03 | 10–16 | 6 s | 144 | Wide view: courier looking at shelter across puddle | Rain |
| P04A | 16–19 | 3 s | 72 | Coat held open; parcel still outside | Cloth rustle |
| P04B | 19–22 | 3 s | 72 | Parcel tucked inside; hand securing coat | “Stay dry” |
| P05A | 22–24 | 2 s | 48 | Courier at puddle edge, weight on rear foot | Footstep |
| P05B | 24–26 | 2 s | 48 | Leading foot in shallow water; splash drawn around shoe | Splash at 24 s |
| P05C | 26–29 | 3 s | 72 | Both feet under shelter; coat still closed | Rain softens |
| P06A | 29–32 | 3 s | 72 | Coat open; hand resting on dry parcel on bench | Cloth rustle |
| P06B | 32–36 | 4 s | 96 | Parcel unchanged; courier's hand withdrawn, relieved smile | Exhale |
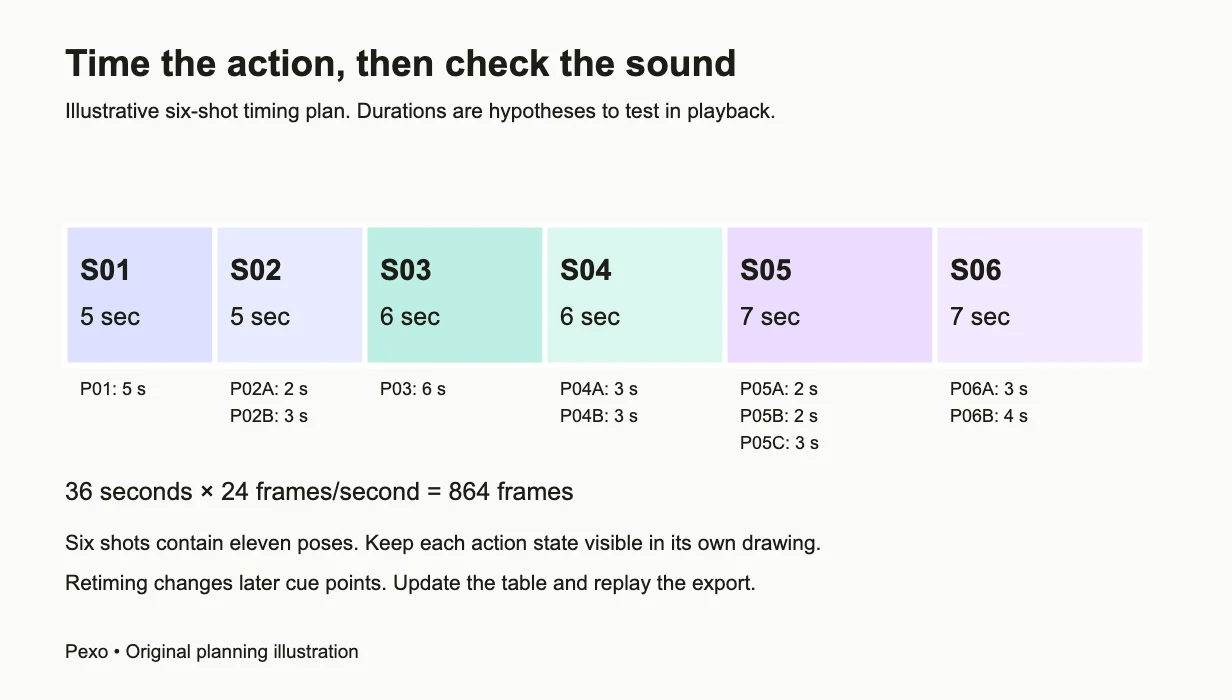
Illustrative timing plan: six shots contain eleven distinct poses. Check the proposed holds in playback.
Step 2: Create and refine the storyboard stills
Describe the scene to Pexo with the panel list, framing, and continuity requirements. For initial storyboard stills from text, specify a rough drawing style, one courier, the same coat and parcel, and a consistent shelter position. Request the eleven separate poses in the table. Judge silhouettes and prop positions before texture.
A usable direction is: “Create the numbered still poses in this table. Keep the parcel rectangular and unmarked, the coat dark, and travel left to right. Keep the camera fixed within each lettered pose group. P04A shows the parcel outside the coat; P04B shows it tucked inside.” Review every image against its row. Correct an umbrella that repairs itself or a parcel that changes shape before assembly.
Step 3: Preserve panel IDs and prepare scratch sound
Save approved drawings as P01_v01, P02A_v01, and so on, adding image extensions. Keep pose IDs fixed when revising: P04B_v02 replaces a drawing, not a story beat. Add another numbered pose only when a necessary state is missing, and update the table. Pexo's image generation and refinement can supply revised stills; you must still check continuity yourself.
Ask Pexo for a provisional spoken “Stay dry” and the audio materials needed to judge the action, or record the line yourself. Keep speech and effects separately identifiable. This is scratch sound, so intelligibility and useful pauses matter more than performance polish. Listen to the actual files before assigning holds. Do not assume a requested line length guarantees an exact duration. Keep audio originals with the drawings. Replacing the line can change its pauses and therefore the required hold, even when the words stay identical.
Step 4: Assemble panels and sound in your timeline app
Create a sequence at your chosen frame rate, place the eleven stills in table order, and set every duration explicitly. Use hard cuts first. Toon Boom's official timing guidance establishes panel length and playback as the basis for testing pace. A pose change within P05 is a board change, not a new camera angle.
For a native example in Storyboard Pro 24, set the project properties to 24 fps and open Windows > Timeline. Select P01 and enter 0:00:05:00 in the Panel view's Duration field: five seconds equals 120 frames. Repeat with the table's holds. Import the snap using File > Import > Sound Clip, choose Current Frame with the playhead at 00:00:07:00, and enable Play > Audio Playback. The official audio instructions document that import and playback distinction. Place the splash at 00:00:24:00, under P05B's contact pose. Use separate tracks for overlapping sounds.
Step 5: Play the sequence and retime the weak beats
Watch once without stopping, then write observations using pose IDs. Replay without sound to check the route, parcel transfer, and crossing. Listen without looking for rushed speech or mistimed effects. The splash should meet P05B, not the approach pose. If an action remains unclear, add or redraw its missing state instead of hiding it beneath sound.
Here is a concrete alternative to compare, not an observed improvement: shorten P03 from six to four seconds and P06B from four to three. The revision totals 33 seconds, or 792 frames. P04A now starts at 14 seconds, the splash moves to 22 seconds, and P06B runs from 30 to 33. Update the table and move affected cues manually if ripple editing does not carry audio with picture. Compare both versions before keeping either; 36 seconds is not a target to defend.
Step 6: Export a review movie and check the file
Export a versioned review movie with sound, retaining the editable project and original files. In Storyboard Pro 24, choose File > Export > Movie, set One Clip to Per Project, select the All range, and choose a supported movie format. This produces one review file rather than separate scene files. In another timeline app, use its equivalent whole-sequence export.
Open the exported movie outside the timeline app. Check the first frame, every cut, the final hold, total duration, and audible cues. A successful timeline preview does not establish that the export is correct. Send the movie together with the current timing table and a short question such as “Do the coat poses explain where the parcel goes?” Collect notes against that version before making another pass.
Common mistakes that weaken an animatic
Most pacing problems start with missing information or unclear revision records. Check these before commissioning more artwork.
- Equal holds for every panel: the shelter view and the final reaction have different reading demands. Start with beat-specific durations, then judge playback.
- Several actions hidden inside one drawing: one drawing cannot show an umbrella before and after failure. Add the necessary states, as with P02A and P02B.
- Sound doing all the explaining: dialogue cannot repair a shelter placed offscreen with no establishing view. Clarify the picture before adding narration.
- Replacing files without tracking versions: reviewers can discuss different drawings under the same filename. Preserve the panel ID, increment the version, and record which file the sequence uses.
Make the next review more useful
Ask a viewer unfamiliar with the plan to describe what happened before you explain it. Record where their account diverges from the intended cause and effect. A practical review note names the panel, the confusion, and the decision needed. Separate “I did not notice the shelter” from “I prefer a different drawing style.” Resolve the comprehension issue first.
Use motion only when staging genuinely depends on it. Here, approach, contact, and arrival poses test the crossing without generating a moving shot. Keep camera movement provisional. Once the scene reads, freeze a review version and preserve its timing table. An existing video timeline is sufficient if it supports exact still durations, audio cues, and whole-sequence export.
Conclusion
The useful result is an approved account of what happens, how long it needs, and where the sound lands. Keep the six-shot sequence rough until those decisions hold up in playback. Refine a still with Pexo when a picture needs clarification, then retime and verify the assembled movie before moving into finished animation.